Observations on ARM (Bicep) Templates
- Azure Deployment Framework docs sections
- Go: README (GithHub Home)
- Go Home Documentation Home
- This Page Deploy your First App
- Go Next Deploy your Second App
Getting Started
Azure Resource Group Deployment - Multi-Region/Multi-Tier Hub/Spoke Environments
Setup Steps:
- Fork the Repo
- Clone the Repo
set-location -Path D:\Reposgh repo clone <yourProjectForkName>/AzureDeploymentFramework ADF
- Review the Tools/Setup Tools Setup
- Open the cloned repo in VSCode Insiders
code-insiders .\ADF\ADF.code-workspace- Accept the install of the Extensions
- Ctrl+ J to open the console in vscode
- I also recommend having a second window Open in the (Windows or other) Terminal
- Now you can create your own App Tenant directory.
- Choose your AppName e.g. DEF
- Just copy one of the existing, such as AOA.
mkdir .\ADF\tenants\DEFCopy-Item -Path .\ADF\tenants\AOA\* -Destination .\ADF\tenants\DEF\ -Recurse- We validate the tenant names in 3 places, so add your new tenant name
- Edit this file
ADF\release-az\Start-AzDeploy.ps1-
Add the new tenant/app Name e.g. ‘DEF’ to the validateset

-
- Edit this file
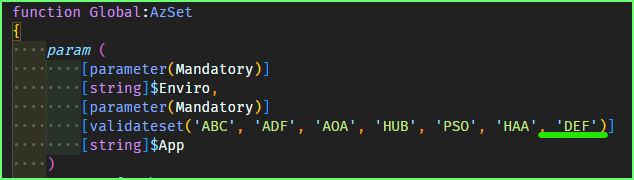
ADF\release-az\azSet.psm1-
Add the new tenant/app Name e.g. ‘DEF’ to the validateset
-
- Edit this file
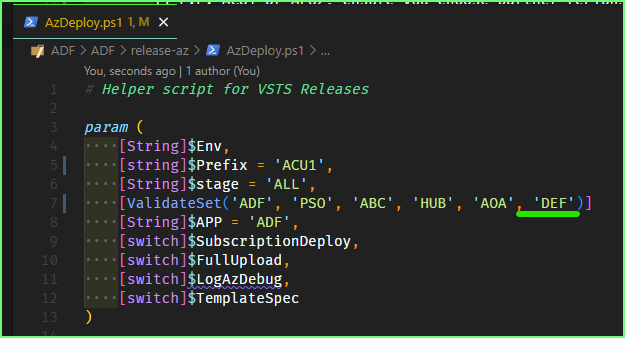
ADF\release-az\AzDeploy.ps1-
Add the new tenant/app Name e.g. ‘DEF’ to the validateset
-
- Edit this file
- Update the ‘AppName’ in
.\ADF\tenants\DEF\Global-Global.jsonto match DEF - Update the ‘OrgName’ in
.\ADF\tenants\DEF\Global-Global.jsonto match your Team name NYC
- You can Choose your Primary and Secondary Azure Deployment Regions
- E.g. ACU1 or AEU2, ensure you choose partner regions in Azure
- Your deployment can be HA across these regions or simply used for DR
- Choose what Enviro you want to deploy to in each Region
- S1 for a Sandbox 1 Environment
- D4 for a Developent 4 Environment
- U6 for a UAT 6 Environment
- P7 for a Production 8 Environment
- Based on the Previous 2 steps you can delete any files or update the names to match your requirements
- You need 1 Global-Prefix.json file Per Region that you want to deploy into
- Update the Network ranges in these files so they are unique per region that you choose
- There are some ADO Pipeline files you can come back to these.
- There is an azure-Deploy.ps1 that has some of the deployment steps to actually deploy out each Enviro.
- you can rename the parameters in that file to match your chosen tenant name E.g. ADF
- Plus you can rename the Enviro to the Deployment partition that you wish to deploy E.g. G1
- Deployment Partitions Deployment Partitions
- Now you should be ready to deploy.
- Ensure you are logged into Azure and are set to the correct Subscription and Context
- There are some more Pre-Req. steps, however you may not need these straight away
- Getting Started Pre-reqs
- Create storage account for artifacts e.g. vm DSC Extension files
- Create keyvault for secrets and certs
- Create a self signed web cert, if needed for Virtual Machines or VMSS etc.
- Export out role definitions that are custom to your Subscription/Tenant
- Create service principals for ADO deployments + connectors
- Create service principals for GitHub deployments + secrets
- Sync keyvault secrets and certs from the primary region to a secondary region
- Getting Started Pre-reqs
Deploy Steps:
# I recommend to put this in your own Powershell profile, so it's loaded by default
New-Variable -Name Repos -Value 'D:/Repos' -Scope Global -Force
$null = New-PSDrive -Name AZ -PSProvider FileSystem -Root $Repos -EA 0
Set-Location -Path AZ:
Import-Module oh-my-posh
Set-PoshPrompt -Theme $PoshPromptPath
Import-Module posh-git
Import-Module Terminal-Icons
Import-Module Az.Accounts
Import-Module -Name $Repos/ADF/ADF/release-az/azSet.psm1 -Scope Global -Force
Now in the Terminal you can setup Scope that you want to deploy
- Tenant (The app name)
- Enviro (Deployment Partition or deployment stamp, see Orchestration Templates below)
Execute the AzSet command to select your app tenant and Enviro
azset -App DEF -Enviro G0
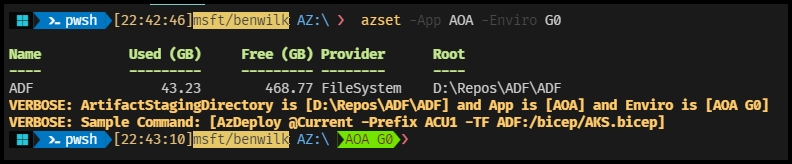
The AzSet function also sets an Enviro Variable so you can track this setting in your prompt
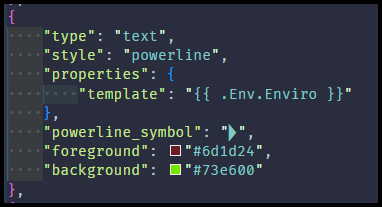
Add this to track on prompt (oh-my-posh env variable)
$env:Enviro = "${App} ${Enviro}"-
This can be viewed here: Install-Tools.ps1
Once this setup has been complete you can look at the docs for the following for deploying: